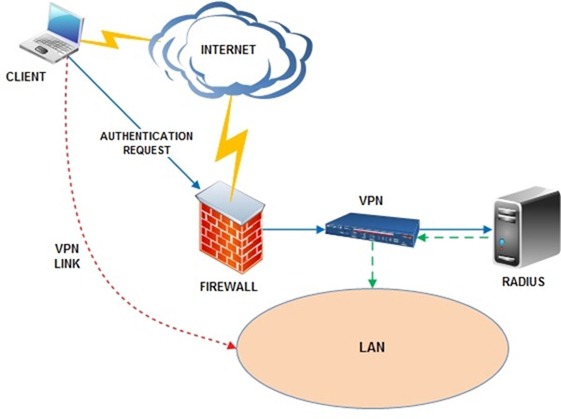
The Network Policy Services (NPS) is a service included in Windows Server 2008 acting as RADIUS to authenticate remote clients against Active Directory.
In Active Directory environment is possible to setup the authentication process through RADIUS with existing accounts configured in the network setting NPS service properly.

Installing NPS service
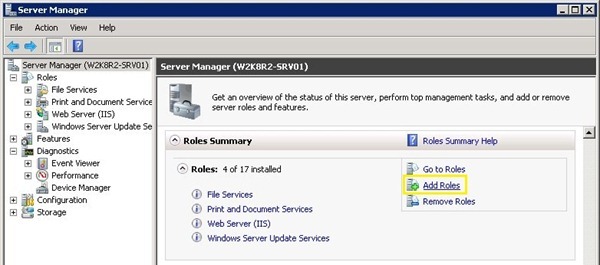
First step is the installation of the NPS service on the Windows 2008 R2 server. Open the Server Manager and click the option Add Roles to add the new role to the server.

Click Next.

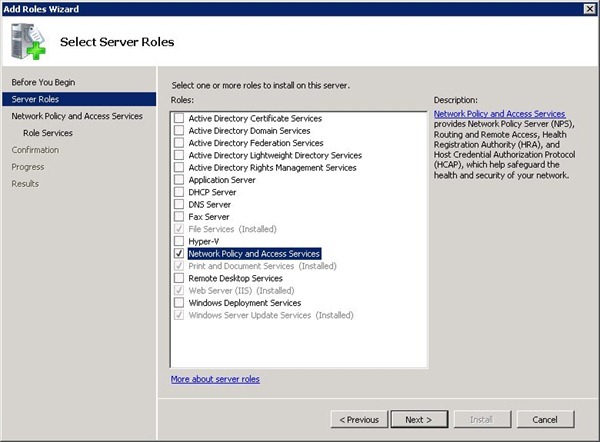
Select Network Policy and Access Services and click Next.

Click Next.

Select Network Policy Server option and click Next.

To perform the installation, click the Install button.

Service components are installed in the server.

Once the procedure ends, the installation result is shown. Click Close button to exit the window.

The service is now installed but needs to be configured to properly work.
NPS configuration
To proceed with the configuration, access the service from Start > Administrative Tools > Network Policy Server.

Right click on RADIUS Client item to create a new client and select option New.

In the Settings panel, enable the client by flagging option Enable this RADIUS client. Assign a Friendly Name and the server/router VPN Address (IP or DNS). To generate the shared secret for the RADIUS <-> Server VPN communication, use the option Generate to automatically create the key paying attention to VPN server specifications because sometimes long strings keys could create some problems. Use option Manual to enter a manual string instead.

Click Advanced and set value RADIUS Standard as Vendor name if the VPN server vendor didn’t provide different advices.

Once the client has been created, from main window of NPS right-click item Network Policies and select option New to create a new policy.

In Policy Name field specify the new policy name. Leave default Unspecified value in Type of network access server field. Click Next to continue.

Click Add button to specify what conditions are evaluated during authentication process.

If the account is authenticated through Active Directory group membership, select Windows Groups item and click Add.

Click Add Groups button to specify the AD group.

Insert AD group and click OK.

Selected AD group is now on the list of Windows Groups. Click OK to continue.

To setup additional conditions, click Add button.

In order to limit authentication requests to a specific VPN server, select condition Client IPv4 Address and click Add.

Enter the VPN server IP Address and click OK.

Completed all the entries, click Next to continue.

Click option Access Granted to enable the access to the system.

In this screen, you define the protocol type used for authentication. Check vendor specifications of your VPN server to select required authentication protocols. To perform EAP authentication for instance, EAP Types must be configured by clicking the Add button.

Select required protocol then click OK.

When authentication protocols have been entered, click Next.

Specify Constraints if requested. Click Next.

From Settings window, set additional attributes requested by the VPN server. For example, Watchguard firewalls require Filter-ID attribute to grant VPN access. Click Add button to add a new attribute.

From attributes list select value Filter-ID and click Add.

Click Add to define the attribute information requested by the VPN server for the attribute previously selected.

From the VPN server vendor instructions, insert the right Attribute Information (L2TP-Users in the example) and click OK to confirm.

If some attributes are not longer needed, select and remove them with Remove button.

When the setup is complete, click OK.

A configuration summary is shown with policy conditions and settings. Click Finish to complete the procedure.

To process in the right way the just created policy, move it at the top of the list.

For the correct functionality of RADIUS authentication, server must be registered in Active Directory. From main screen of NPS right-click NPS (local) and select option Register server in Active Directory.

Click OK to authorize the local server in AD.

Click OK to complete the server registration step.

RADIUS server configuration is now complete.
Enable RADIUS authentication
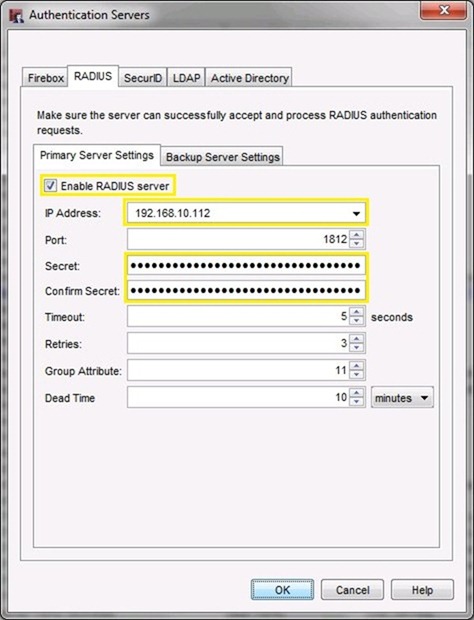
To enable VPN clients authentication in the system, the RADIUS authentication type must be configured in the VPN server.

Enable and insert the correct IP Address of your RADIUS server. Type the Shared Secretpreviously created. Be careful that typed characters in the Secret field must be the same as defined in the RADIUS server settings otherwise authentication process will fail.

When a VPN connection starts, the client is authenticated through the RADIUS server checking the Active Directory group membership and granting the network access as shown in the Windows log.

If some authentication issues are experienced, looking at the Windows log you can identify where the problem reside.

This solution allows a good authentication management process of remote clients giving the network a higher security level.