Step 1: Initial Configuration for Samba4
1. Before proceeding your Samba4 AD DC installation first let’s run a few pre-required steps. First make sure the system is up to date with the last security features, kernels and packages by issuing the below command:
$ sudo apt-get update
$ sudo apt-get upgrade
$ sudo apt-get dist-upgrade
2. Next, open machine /etc/fstab file and assure that your partitions file system has ACLs enabled as illustrated on the below screenshot.
Usually, common modern Linux file systems such as ext3, ext4, xfs or btrfs support and have ACLs enabled by default. If that’s not the case with your file system just open /etc/fstab file for editing and add acl string at the end of third column and reboot the machine in order to apply changes.
3. Finally setup your machine hostname with a descriptive name, such as adc1 used in this example, by editing /etc/hostname file or by issuing.
$ sudo hostnamectl set-hostname adc1
A reboot is necessary after you’ve changed your machine name in order to apply changes.
Step 2: Install Required Packages for Samba4 AD DC
4. In order to transform your server into an Active Directory Domain Controller, install Samba and all the required packages on your machine by issuing the below command with root privileges in a console.
$ sudo apt-get install samba krb5-user krb5-config winbind libpam-winbind libnss-winbind
5. While the installation is running a series of questions will be asked by the installer in order to configure the domain controller.
On the first screen you will need to add a name for Kerberos default REALM in uppercase. Enter the name you will be using for your domain in uppercase and hit Enter to continue..
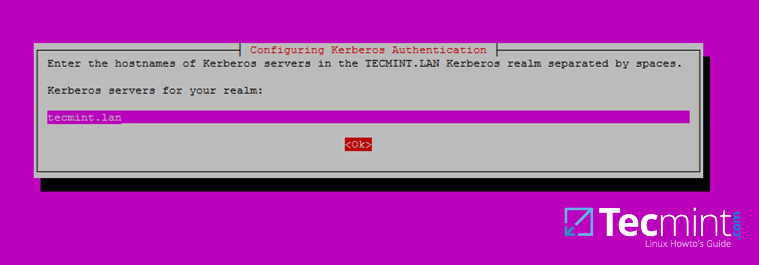
6. Next, enter the hostname of Kerberos server for your domain. Use the same name as for your domain, with lowercases this time and hit Enter to continue.
7. Finally, specify the hostname for the administrative server of your Kerberos realm. Use the same as your domain and hit Enter to finish the installation.
Step 3: Provision Samba AD DC for Your Domain
8. Before starting to configure Samba for your domain, first run the below commands in order to stop and disable all samba daemons.
$ sudo systemctl stop samba-ad-dc.service smbd.service nmbd.service winbind.service
$ sudo systemctl disable samba-ad-dc.service smbd.service nmbd.service winbind.service
9. Next, rename or remove samba original configuration. This step is absolutely required before provisioning Samba AD because at the provision time Samba will create a new configuration file from scratch and will throw up some errors in case it finds an old smb.conf file.
$ sudo mv /etc/samba/smb.conf /etc/samba/smb.conf.initial
10. Now, start the domain provisioning interactively by issuing the below command with root privileges and accept the default options that Samba provides you.
Also, make sure you supply the IP address for a DNS forwarder at your premises (or external) and choose a strong password for Administrator account. If you choose a week password for Administrator account the domain provision will fail.
$ sudo samba-tool domain provision --use-rfc2307 --interactive
11. Finally, rename or remove Kerberos main configuration file from /etc directory and replace it using a symlink with Samba newly generated Kerberos file located in /var/lib/samba/private path by issuing the below commands:
$ sudo mv /etc/krb6.conf /etc/krb5.conf.initial
$ sudo ln –s /var/lib/samba/private/krb5.conf /etc/
12. Start and enable Samba Active Directory Domain Controller daemons.
$ sudo systemctl start samba-ad-dc.service
$ sudo systemctl status samba-ad-dc.service
$ sudo systemctl enable samba-ad-dc.service
13. Next, use netstat command in order to verify the list of all services required by an Active Directoryto run properly.
$ sudo netstat –tulpn| egrep ‘smbd|samba’
Step 4: Final Samba Configurations
14. At this moment Samba should be fully operational at your premises. The highest domain level Samba is emulating should be Windows AD DC 2008 R2.
It can be verified with the help of samba-tool utility.
$ sudo samba-tool domain level show
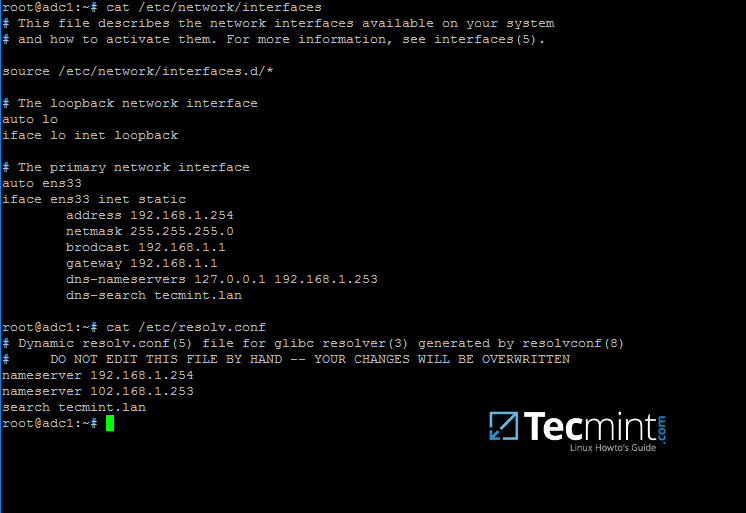
15. In order for DNS resolution to work locally, you need to open end edit network interface settings and point the DNS resolution by modifying dns-nameservers statement to the IP Address of your Domain Controller (use 127.0.0.1 for local DNS resolution) and dns-search statement to point to your realm.
$ sudo cat /etc/network/interfaces
$ sudo cat /etc/resolv.conf
When finished, reboot your server and take a look at your resolver file to make sure it points back to the right DNS name servers.
16. Finally, test the DNS resolver by issuing queries and pings against some AD DC crucial records, as in the below excerpt. Replace the domain name accordingly.
$ ping –c3 tecmint.lan       #Domain Name
$ ping –c3 adc1.tecmint.lan  #FQDN
$ ping –c3 adc1              #Host
Run following few queries against Samba Active Directory Domain Controller..
$ host –t A tecmint.lan
$ host –t A adc1.tecmint.lan
$ host –t SRV _kerberos._udp.tecmint.lan  # UDP Kerberos SRV record
$ host -t SRV _ldap._tcp.tecmint.lan # TCP LDAP SRV record
17. Also, verify Kerberos authentication by requesting a ticket for the domain administrator account and list the cached ticket. Write the domain name portion with uppercase.
$ kinit administrator@TECMINT.LAN
$ klist
That’s all! Now you have a fully operational AD Domain Controller installed in your network and you can start integrate Windows or Linux machines into Samba AD.
On the next series we’ll cover other Samba AD topics, such as how to manage you’re the domain controller from Samba command line, how to integrate Windows 10 into the domain name and manage Samba AD remotely using RSAT and other important topics.
Step 1: Manage Samba AD DC from Command Line
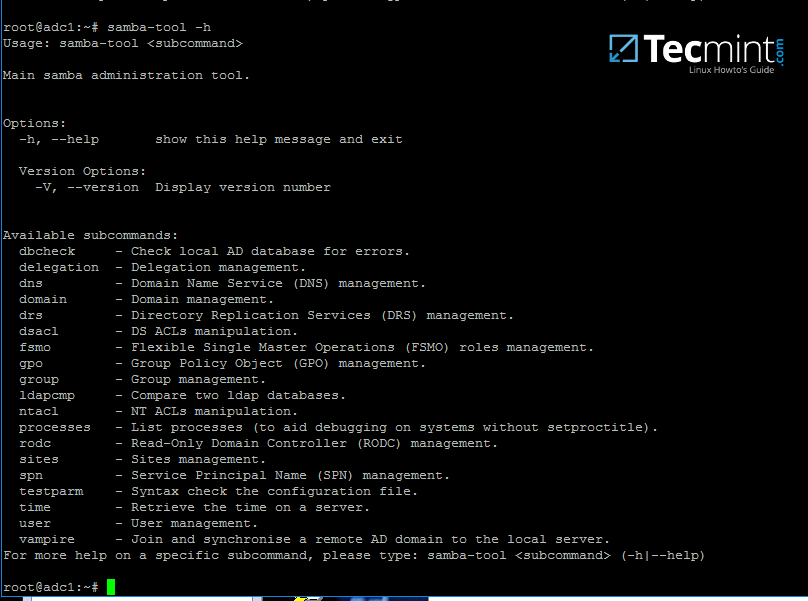
1. Samba AD DC can be managed through samba-tool command line utility which offers a great interface for administrating your domain.
With the help of samba-tool interface you can directly manage domain users and groups, domain Group Policy, domain sites, DNS services, domain replication and other critical domain functions.
# samba-tool -h
2. Now, let’s start using samba-tool utility to administer Samba4 Active Directory and manage our users.
In order to create a user on AD use the following command:
# samba-tool user add your_domain_user
To add a user with several important fields required by AD, use the following syntax:
--------- review all options ---------
# samba-tool user add -h
# samba-tool user add your_domain_user --given-name=your_name --surname=your_username --mail-address=your_domain_user@tecmint.lan --login-shell=/bin/bash
3. A listing of all samba AD domain users can be obtained by issuing the following command:
# samba-tool user list
4. To delete a samba AD domain user use the below syntax:
# samba-tool user delete your_domain_user
5. Reset a samba domain user password by executing the below command:
# samba-tool user setpassword your_domain_user
6. In order to disable or enable an samba AD User account use the below command:
# samba-tool user disable your_domain_user
# samba-tool user enable your_domain_user
7. Likewise, samba groups can be managed with the following command syntax:
--------- review all options ---------
# samba-tool group add –h
# samba-tool group add your_domain_group
8. Delete a samba domain group by issuing the below command:
# samba-tool group delete your_domain_group
9. To display all samba domain groups run the following command:
# samba-tool group list
10. To list all the samba domain members in a specific group use the command:
# samba-tool group listmembers "your_domain group"
11. Adding/Removing a member from a samba domain group can be done by issuing one of the following commands:
# samba-tool group addmembers your_domain_group your_domain_user
# samba-tool group remove members your_domain_group your_domain_user
12. As mentioned earlier, samba-tool command line interface can also be used to manage your samba domain policy and security.
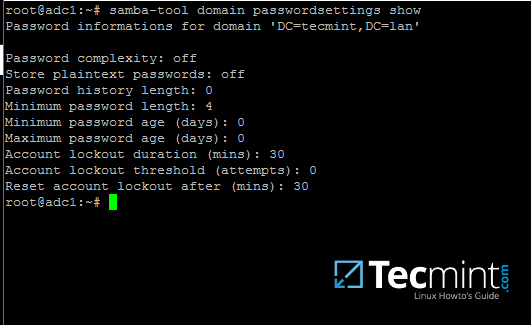
To review your samba domain password settings use the below command:
# samba-tool domain passwordsettings show
13. In order to modify samba domain password policy, such as the password complexity level, password ageing, length, how many old password to remember and other security features required for a Domain Controller use the below screenshot as a guide.
---------- List all command options ----------
# samba-tool domain passwordsettings -h
Never use the password policy rules as illustrated above on a production environment. The above settings are used just for demonstration purposes.
Step 2: Samba Local Authentication Using Active Directory Accounts
14. By default, AD users cannot perform local logins on the Linux system outside Samba AD DCenvironment.
In order to login on the system with an Active Directory account you need to make the following changes on your Linux system environment and modify Samba4 AD DC.
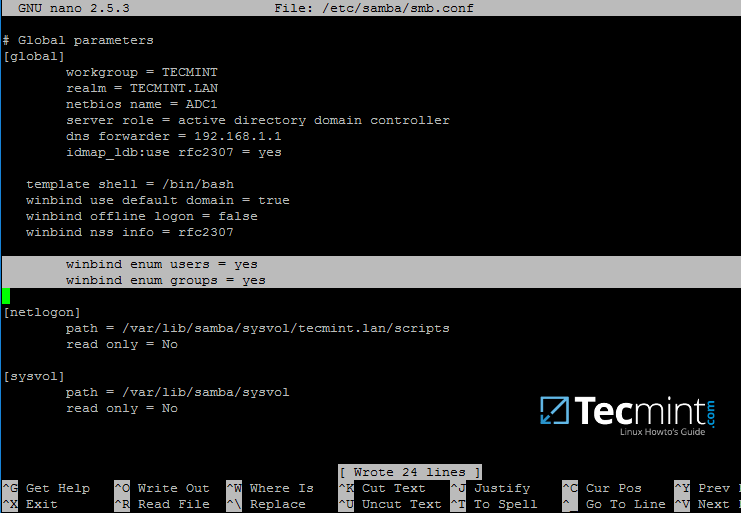
First, open samba main configuration file and add the below lines, if missing, as illustrated on the below screenshot.
$ sudo nano /etc/samba/smb.conf
Make sure the following statements appear on the configuration file:
winbind enum users = yes
winbind enum groups = yes
15. After you’ve made the changes, use testparm utility to make sure no errors are found on samba configuration file and restart samba daemons by issuing the below command.
$ testparm
$ sudo systemctl restart samba-ad-dc.service
16. Next, we need to modify local PAM configuration files in order for Samba4 Active Directoryaccounts to be able to authenticate and open a session on the local system and create a home directory for users at first login.
Use the pam-auth-update command to open PAM configuration prompt and make sure you enable all PAM profiles using [space] key as illustrated on the below screenshot.
When finished hit [Tab] key to move to Ok and apply changes.
$ sudo pam-auth-update
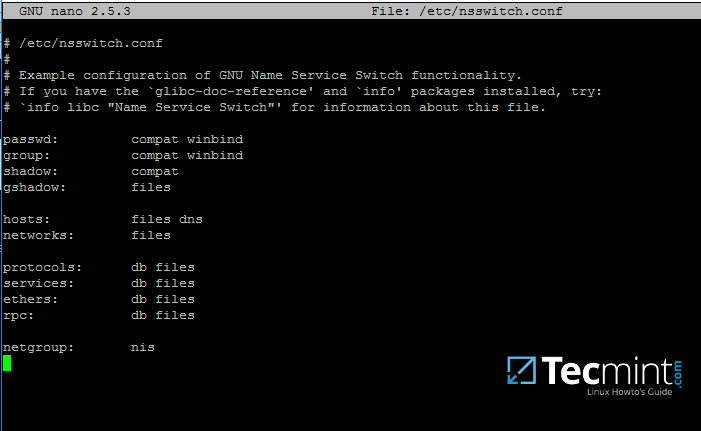
17. Now, open /etc/nsswitch.conf file with a text editor and add winbind statement at the end of the password and group lines as illustrated on the below screenshot.
$ sudo vi /etc/nsswitch.conf
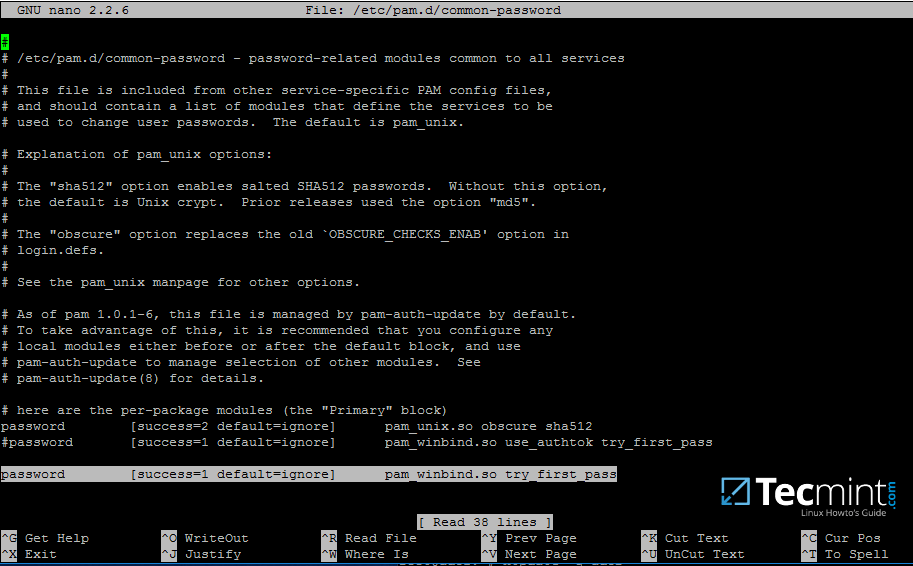
18. Finally, edit /etc/pam.d/common-password file, search for the below line as illustrated on the below screenshot and remove the use_authtok statement.
This setting assures that Active Directory users can change their password from command line while authenticated in Linux. With this setting on, AD users authenticated locally on Linux cannot change their password from console.
password [success=1 default=ignore] pam_winbind.so try_first_pass
Remove use_authtok option each time PAM updates are installed and applied to PAM modules or each time you execute pam-auth-update command.
19. Samba4 binaries comes with a winbindd daemon built-in and enabled by default.
For this reason you’re no longer required to separately enable and run winbind daemon provided by winbind package from official Ubuntu repositories.
In case the old and deprecated winbind service is started on the system make sure you disable it and stop the service by issuing the below commands:
$ sudo systemctl disable winbind.service
$ sudo systemctl stop winbind.service
Although, we no longer need to run old winbind daemon, we still need to install Winbind package from repositories in order to install and use wbinfo tool.
Wbinfo utility can be used to query Active Directory users and groups from winbindd daemon point of view.
The following commands illustrates how to query AD users and groups using wbinfo.
$ wbinfo -g
$ wbinfo -u
$ wbinfo -i your_domain_user
20. Apart from wbinfo utility you can also use getent command line utility to query Active Directory database from Name Service Switch libraries which are represented in /etc/nsswitch.conf file.
Pipe getent command through a grep filter in order to narrow the results regarding just your AD realm user or group database.
# getent passwd | grep TECMINT
# getent group | grep TECMINT
Step 3: Login in Linux with an Active Directory User
21. In order to authenticate on the system with a Samba4 AD user, just use the AD usernameparameter after su - command.
At the first login a message will be displayed on the console which notifies you that a home directory has been created on /home/$DOMAIN/ system path with the mane of your AD username.
Use id command to display extra information about the authenticated user.
# su - your_ad_user
$ id
$ exit
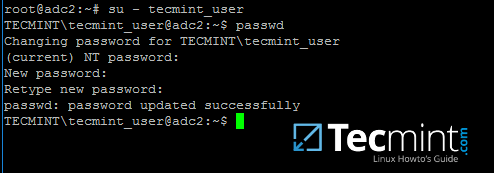
22. To change the password for an authenticated AD user type passwd command in console after you have successfully logged into the system.
$ su - your_ad_user
$ passwd
23. By default, Active Directory users are not granted with root privileges in order to perform administrative tasks on Linux.
To grant root powers to an AD user you must add the username to the local sudo group by issuing the below command.
Make sure you enclose the realm, slash and AD username with single ASCII quotes.
# usermod -aG sudo 'DOMAIN\your_domain_user'
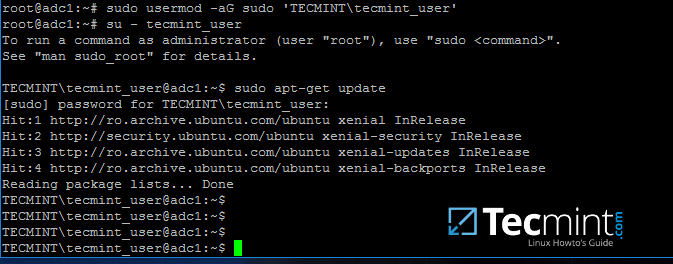
To test if AD user has root privileges on the local system, login and run a command, such as apt-get update, with sudo permissions.
# su - tecmint_user
$ sudo apt-get update
24. In case you want to add root privileges for all accounts of an Active Directory group, edit /etc/sudoers file using visudo command and add the below line after root privileges line, as illustrated on the below screenshot:
%DOMAIN\\your_domain\ group ALL=(ALL:ALL) ALL
Pay attention to sudoers syntax so you don’t break things out.
Sudoers file doesn’t handles very well the use of ASCII quotation marks, so make sure you use % to denote that you’re referring to a group and use a backslash to escape the first slash after the domain name and another backslash to escape spaces if your group name contains spaces (most of AD built-in groups contain spaces by default). Also, write the realm with uppercases.
That’s all for now! Managing Samba4 AD infrastructure can be also achieved with several tools from Windows environment, such as ADUC, DNS Manager, GPM or other, which can be obtained by installing RSAT package from Microsoft download page.
To administer Samba4 AD DC through RSAT utilities, it’s absolutely necessary to join the Windows system into Samba4 Active Directory. This will be the subject of our next tutorial, till then stay tuned to TecMint.
Manage Samba4 Active Directory Infrastructure from Windows10 via RSAT – Part 3
In this part of the Samba4 AD DC infrastructure series we will talk on how join a Windows 10 machine into a Samba4 realm and how to administer the domain from a Windows 10 workstation.
Once a Windows 10 system has been joined to Samba4 AD DC we can create, remove or disable domain users and groups, we can create new Organizational Units, we can create, edit and manage domain policy or we can manage Samba4 domain DNS service.
All of the above functions and other complex tasks concerning domain administration can be achieved via any modern Windows platform with the help of RSAT – Microsoft Remote Server Administration Tools.
Requirements
- Create an AD Infrastructure with Samba4 on Ubuntu 16.04 – Part 1
- Manage Samba4 AD Infrastructure from Linux Command Line – Part 2
- Manage Samba4 AD Domain Controller DNS and Group Policy from Windows – Part 4
Step 1: Configure Domain Time Synchronization
1. Before starting to administer Samba4 ADDC from Windows 10 with the help of RSAT tools, we need to know and take care of a crucial piece of service required for an Active Directory and this service refers to accurate time synchronization.
Time synchronization can be offered by NTP daemon in most of the Linux distributions. The default maximum time period discrepancy an AD can support is about 5 minutes.
If the divergence time period is greater than 5 minutes you should start experience various errors, most important concerning AD users, joined machines or share access.
To install Network Time Protocol daemon and NTP client utility in Ubuntu, execute the below command.
$ sudo apt-get install ntp ntpdate
2. Next, open and edit NTP configuration file and replace the default NTP pool server list with a new list of NTP servers which are geographically located near your current physical equipment location.
The list of NTP servers can be obtained by visiting official NTP Pool Project webpage http://www.pool.ntp.org/en/.
$ sudo nano /etc/ntp.conf
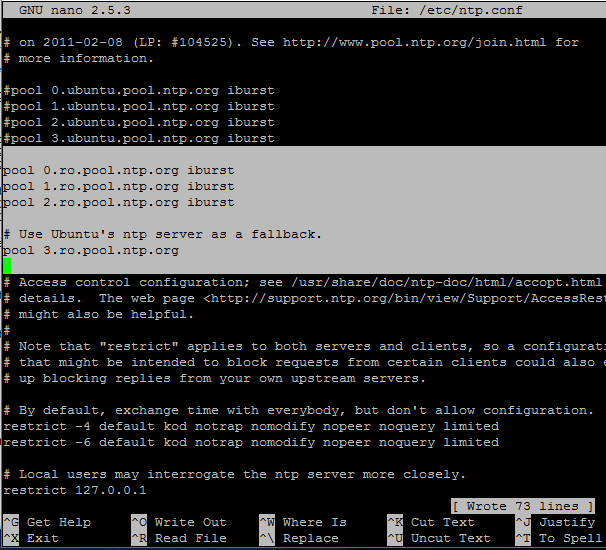
Comment the default server list by adding a # in front of each pool line and add the below pool lines with your proper NTP servers as illustrated on the below screenshot.
pool 0.ro.pool.ntp.org iburst
pool 1.ro.pool.ntp.org iburst
pool 2.ro.pool.ntp.org iburst
# Use Ubuntu's ntp server as a fallback.
pool 3.ro.pool.ntp.org
3. Now, don’t close the file yet. Move to the top at the file and add the below line after the driftfile statement. This setup allows the clients to query the server using AD signed NTP requests.
ntpsigndsocket /var/lib/samba/ntp_signd/
4. Finally, move to the bottom of the file and add the below line, as illustrated on the below screenshot, which will allow network clients only to query the time on the server.
restrict default kod nomodify notrap nopeer mssntp
5. When finished, save and close the NTP configuration file and grant NTP service with the proper permissions in order to read the ntp_signed directory.
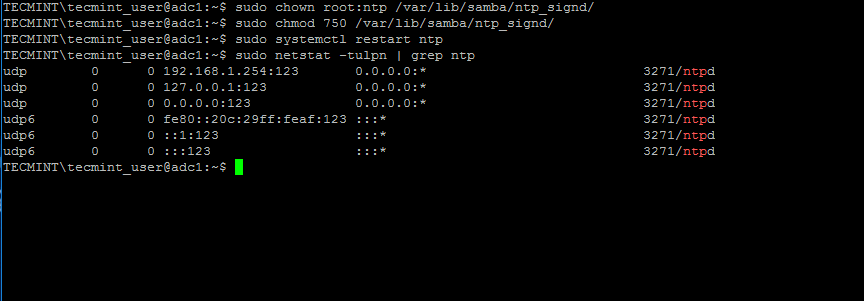
This is the system path where Samba NTP socket is located. Afterwards, restart NTP daemon to apply changes and verify if NTP has open sockets in your system network table using netstat commandcombined with grep filter.
$ sudo chown root:ntp /var/lib/samba/ntp_signd/
$ sudo chmod 750 /var/lib/samba/ntp_signd/
$ sudo systemctl restart ntp
$ sudo netstat –tulpn | grep ntp
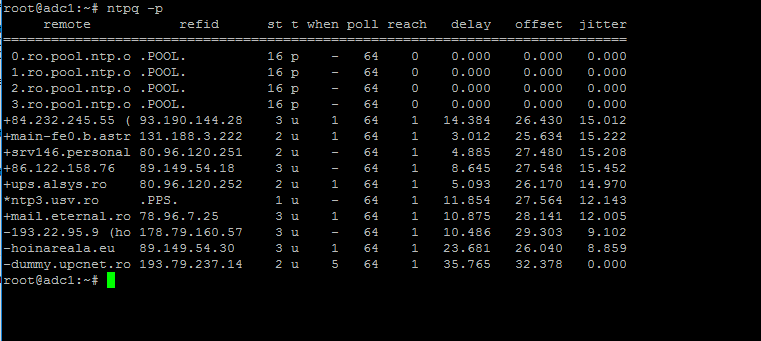
Use the ntpq command line utility to monitor NTP daemon along with the -p flag in order to print a summary of peers state.
$ ntpq -p
Step 2: Troubleshoot NTP Time Issues
6. Sometimes the NTP daemon gets stuck in calculations while trying to synchronize time with an upstream ntp server peer, resulting the following error messages when manually trying to force time synchronization by running ntpdate utility on a client side:
# ntpdate -qu adc1
ntpdate[4472]: no server suitable for synchronization found
when using ntpdate command with -d flag.
# ntpdate -d adc1.tecmint.lan
Server dropped: Leap not in sync
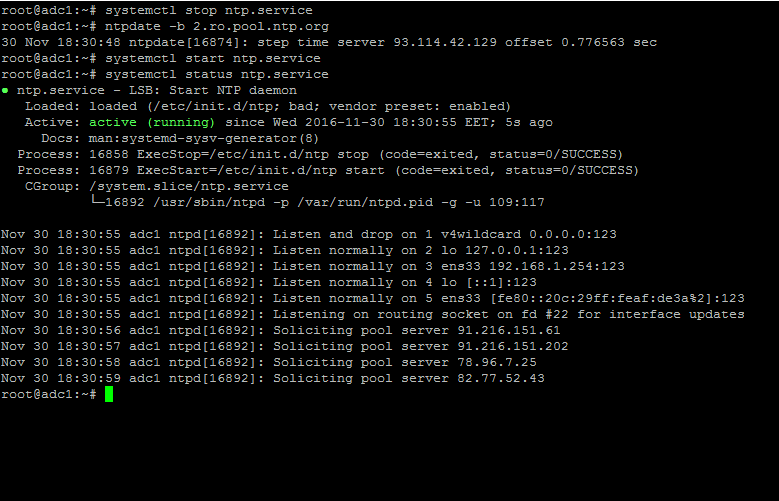
7. To circumvent this issue, use the following trick to solve the problem: On the server, stop the NTP service and use the ntpdate client utility to manually force time synchronization with an external peer using the -b flag as shown below:
# systemctl stop ntp.service
# ntpdate -b 2.ro.pool.ntp.org  [your_ntp_peer]
# systemctl start ntp.service
# systemctl status ntp.service
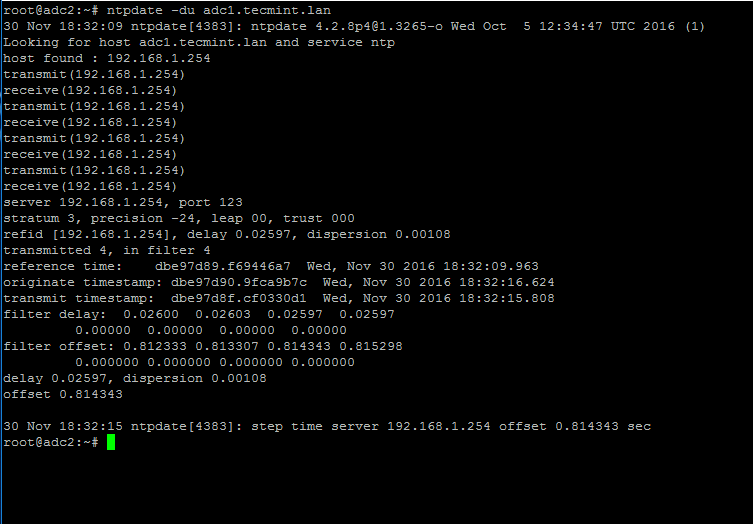
8. After the time has been accurately synchronized, start the NTP daemon on the server and verify from the client side if the service is ready to serve time for local clients by issuing the following command:
# ntpdate -du adc1.tecmint.lan [your_adc_server]
By now, NTP server should work as expected.
Step 3: Join Windows 10 into Realm
9. As we saw in our previous tutorial, Samba4 Active Directory can be managed from command line using samba-tool utility interface which can be accessed directly from server’s VTY console or remotely connected through SSH.
Other, more intuitively and flexible alternative, would be to manage our Samba4 AD Domain Controllervia Microsoft Remote Server Administration Tools (RSAT) from a Windows workstation integrated into the domain. These tools are available in almost all modern Windows systems.
The process of joining Windows 10 or older versions of Microsoft OS into Samba4 AD DC is very simple. First, make sure that your Windows 10 workstation has the correct Samba4 DNS IP address configured in order to query the proper realm resolver.
Open Control panel -> Network and Internet -> Network and Sharing Center -> Ethernet card -> Properties -> IPv4 -> Properties -> Use the following DNS server addresses and manually place Samba4 AD IP Address to the network interface as illustrated in the below screenshots.
Here, 192.168.1.254 is the IP Address of Samba4 AD Domain Controller responsible for DNS resolution. Replace the IP Address accordingly.
10. Next, apply the network settings by hitting on OK button, open a Command Prompt and issue a ping against the generic domain name and Samba4 host FQDN in order to test if the realm is reachable through DNS resolution.
ping tecmint.lan
ping adc1.tecmint.lan
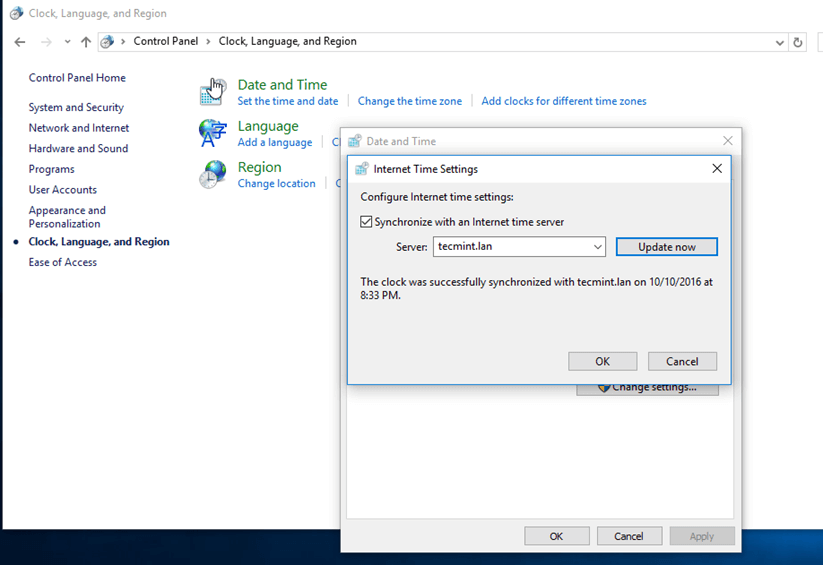
11. If the resolver correctly responds to Windows client DNS queries, then, you need to assure that the time is accurately synchronized with the realm.
Open Control Panel -> Clock, Language and Region -> Set Time and Date -> Internet Time tab -> Change Settings and write your domain name on Synchronize with and Internet time server field.
Hit on Update Now button to force time synchronization with the realm and hit OK to close the window.
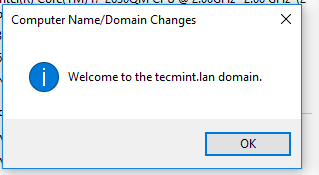
12. Finally, join the domain by opening System Properties -> Change -> Member of Domain, write your domain name, hit OK, enter your domain administrative account credentials and hit OK again.
A new pop-up window should open informing you’re a member of the domain. Hit OK to close the pop-up window and reboot the machine in order to apply domain changes.
The below screenshot will illustrate these steps.
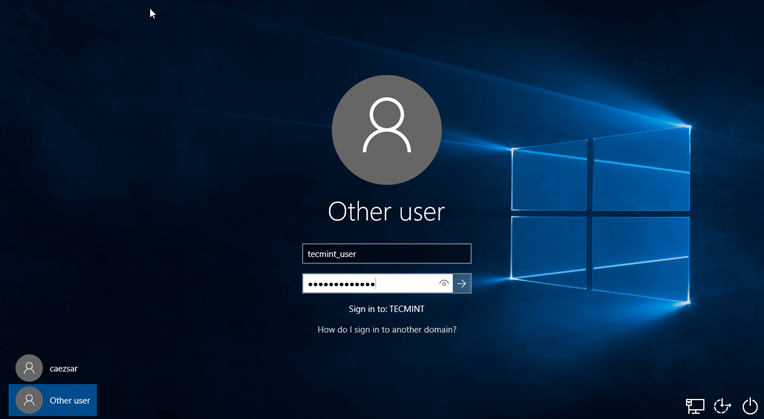
13. After restart, hit on Other user and logon to Windows with a Samba4 domain account with administrative privileges and you should be ready to move to the next step.
Step 4: Administer Samba4 AD DC with RSAT
14.Microsoft Remote Server Administration Tools (RSAT), which will be further used to administer Samba4 Active Directory, can be downloaded from the following links, depending on your Windows version:
- Windows 10: https://www.microsoft.com/en-us/download/details.aspx?id=45520
- Windows 8.1: http://www.microsoft.com/en-us/download/details.aspx?id=39296
- Windows 8: http://www.microsoft.com/en-us/download/details.aspx?id=28972
- Windows 7: http://www.microsoft.com/en-us/download/details.aspx?id=7887
Once the update standalone installer package for Windows 10 has been downloaded on your system, run the installer, wait for the installation to finish and restart the machine to apply all updates.
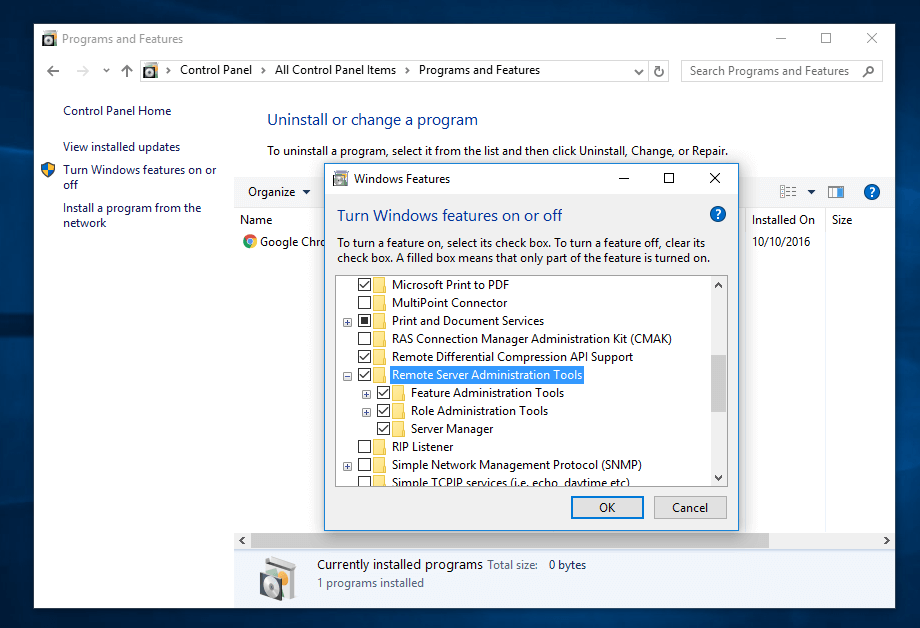
After reboot, open Control Panel -> Programs (Uninstall a Program) -> Turn Windows features on or off and check all Remote Server Administration Tools.
Click OK to start the installation and after the installation process finishes, restart the system.
15. To access RSAT tools go to Control Panel -> System and Security -> Administrative Tools.
The tools can also be found in the Administrative tools menu from start menu. Alternatively, you can open Windows MMC and add Snap-ins using the File -> Add/Remove Snap-in menu.
The most used tools, such as AD UC, DNS and Group Policy Management can be launched directly from Desktop by creating shortcuts using Send to feature from menu.
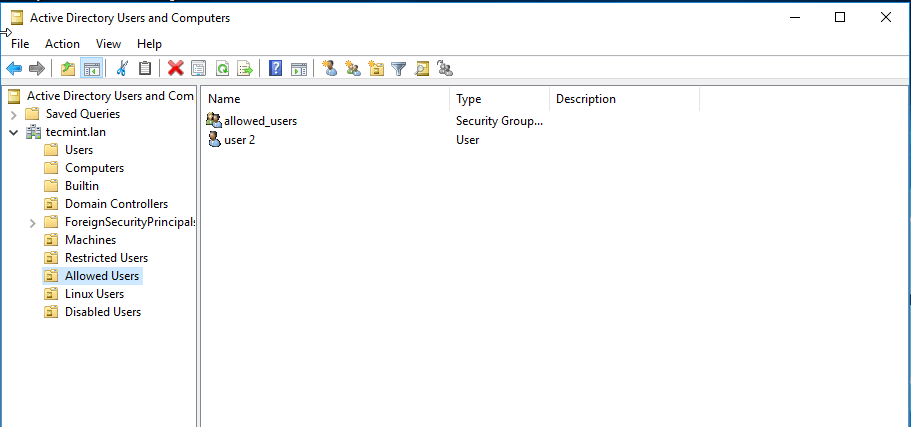
16. You can verify RSAT functionality by opening AD UC and list domain Computers (newly joined windows machine should appear in the list), create a new Organizational Unit or a new user or group.
Verify if the users or groups had been properly created by issuing wbinfo command from Samba4 server side.
That’s it! On the next part of this topic we will cover other important aspects of a Samba4 Active Directory which can be administered via RSAT, such as, how to manage DNS server, add DNS records and create a reverse DNS lookup zone, how to manage and apply domain policy and how to create an interactive logon banner for your domain users.
Manage Samba4 AD Domain Controller DNS and Group Policy from Windows – Part 4
Continuing the previous tutorial on how to administer Samba4 from Windows 10 via RSAT, in this part we’ll see how to remotely manage our Samba AD Domain controller DNS server from Microsoft DNS Manager, how to create DNS records, how to create a Reverse Lookup Zone and how to create a domain policy via Group Policy Management tool.
Requirements
- Create an AD Infrastructure with Samba4 on Ubuntu 16.04 – Part 1
- Manage Samba4 AD Infrastructure from Linux Command Line – Part 2
- Manage Samba4 Active Directory Infrastructure from Windows10 via RSAT – Part 3
Step 1: Manage Samba DNS Server
Samba4 AD DC uses an internal DNS resolver module which is created during the initial domain provision (if BIND9 DLZ module is not specifically used).
Samba4 internal DNS module supports the basic features needed for an AD Domain Controller. The domain DNS server can be managed in two ways, directly from command line through samba-tool interface or remotely from a Microsoft workstation which is part of the domain via RSAT DNS Manager.
Here, we’ll cover the second method because it’s more intuitive and not so prone to errors.
Once the tool opens, it will ask you on what DNS running server you want to connect. Choose The following computer, type your domain name in the field (or IP Address or FQDN can be used as well), check the box that says ‘Connect to the specified computer now’ and hit OK to open your Samba DNSservice.
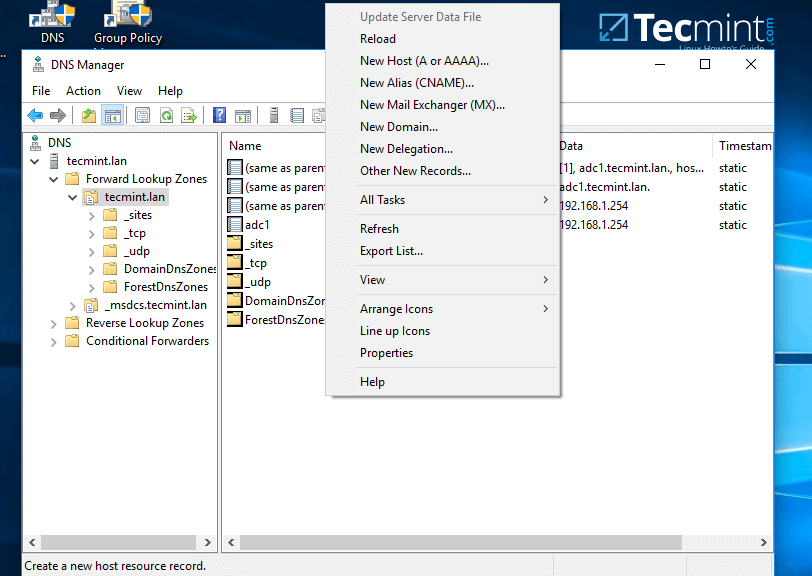
2. In order to add a DNS record (as an example we will add an A record that will point to our LAN gateway), navigate to domain Forward Lookup Zone, right click on the right plane and choose New Host (A or AAA).
3. On the New host opened window, type the name and the IP Address of your DNS resource. The FQDN will be automatically written for you by DNS utility. When finished, hit the Add Host button and a pop-up window will inform you that your DNS A record has been successfully created.
Make sure you add DNS A records only for those resources in your network configured with static IP Addresses. Don’t add DNS A records for hosts which are configured to acquire network configurations from a DHCP server or their IP Addresses change often.
To update a DNS record just double click on it and write your modifications. To delete the record right click on the record and choose delete from the menu.
In the same way you can add other types of DNS records for your domain, such as CNAME (also known as DNS alias record) MX records (very useful for mail servers) or other type of records (SPF, TXT, SRV etc).
Step 2: Create a Reverse Lookup Zone
By default, Samba4 Ad DC doesn’t automatically add a reverse lookup zone and PTR records for your domain because these types of records are not crucial for a domain controller to function correctly.
Instead, a DNS reverse zone and its PTR records are crucial for the functionality of some important network services, such as an e-mail service because these type of records can be used to verify the identity of clients requesting a service.
Practically, PTR records are just the opposite of standard DNS records. The clients know the IP address of a resource and queries the DNS server to find out their registered DNS name.
4. In order to a create a reverse lookup zone for Samba AD DC, open DNS Manager, right click on Reverse Lookup Zone from the left plane and choose New Zone from the menu.
5. Next, hit Next button and choose Primary zone from Zone Type Wizard.
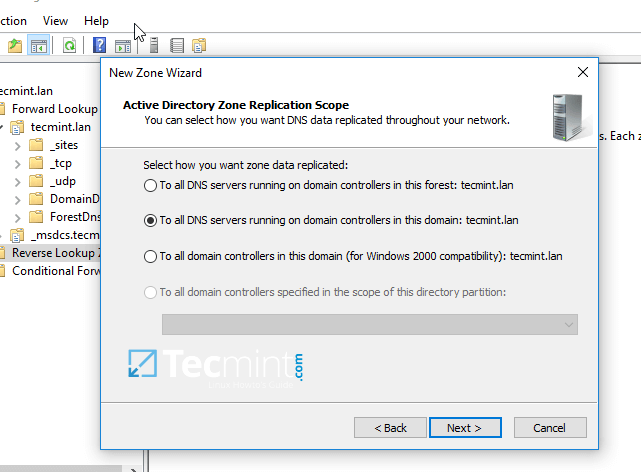
6. Next, choose To all DNS servers running on domain controllers in this domain from the AD Zone Replication Scope, chose IPv4 Reverse Lookup Zone and hit Next to continue.
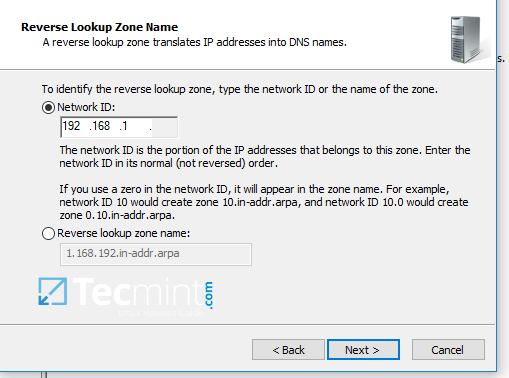
7. Next, type the IP network address for your LAN in Network ID filed and hit Next to continue.
All PTR records added in this zone for your resources will point back only to 192.168.1.0/24 network portion. If you want to create a PTR record for a server that does not reside in this network segment (for example mail server which is located in 10.0.0.0/24 network), then you’ll need to create a new reverse lookup zone for that network segment as well.
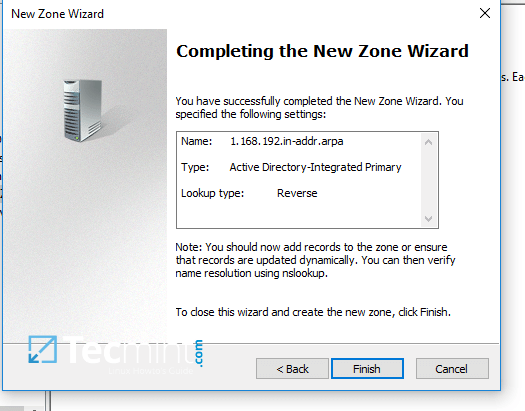
8. On the next screen choose to Allow only secure dynamic updates, hit next to continue and, finally hit on finish to complete zone creation.
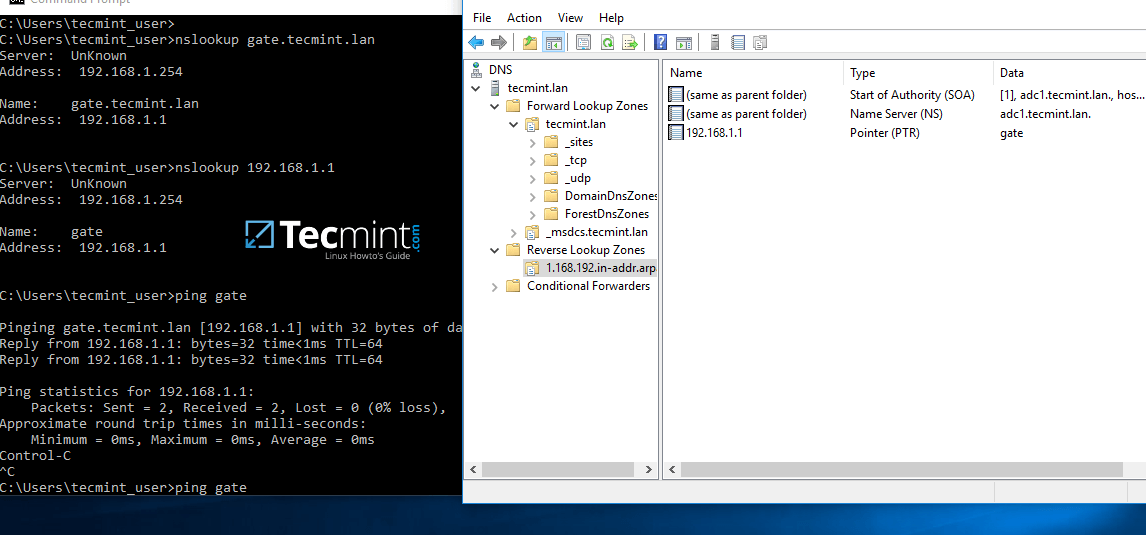
9. At this point you have a valid DNS reverse lookup zone configured for your domain. In order to add a PTR record in this zone, right click on the right plane and choose to create a PTR record for a network resource.
In this case we’ve created a pointer for our gateway. In order to test if the record was properly added and works as expected from client’s point of view, open a Command Prompt and issue a nslookupquery against the name of the resource and another query for its IP Address.
Both queries should return the correct answer for your DNS resource.
nslookup gate.tecmint.lan
nslookup 192.168.1.1
ping gate
Step 3: Domain Group Policy Management
10. An important aspect of a domain controller is its ability to control system resources and security from a single central point. This type of task can be easily achieved in a domain controller with the help of Domain Group Policy.
Unfortunately, the only way to edit or manage group policy in a samba domain controller is through RSAT GPM console provided by Microsoft.
In the below example we’ll see how simple can be to manipulate group policy for our samba domain in order to create an interactive logon banner for our domain users.
In order to access group policy console, go to Control Panel -> System and Security -> Administrative Tools and open Group Policy Management console.
Expand the fields for your domain and right click on Default Domain Policy. Choose Edit from the menu and a new windows should appear.
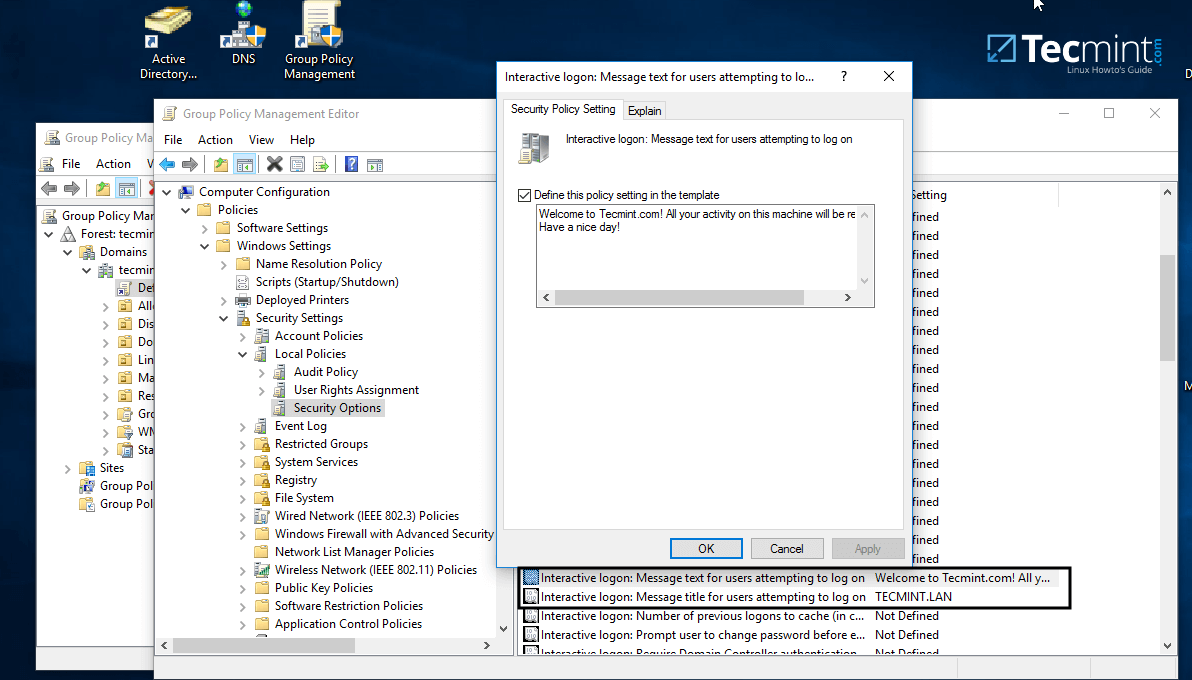
11. On Group Policy Management Editor window go to Computer Configuration -> Policies ->Windows Settings -> Security settings -> Local Policies -> Security Options and a new options list should appear in the right plane.
In the right plane search and edit with your custom settings following two entries presented on the below screenshot.
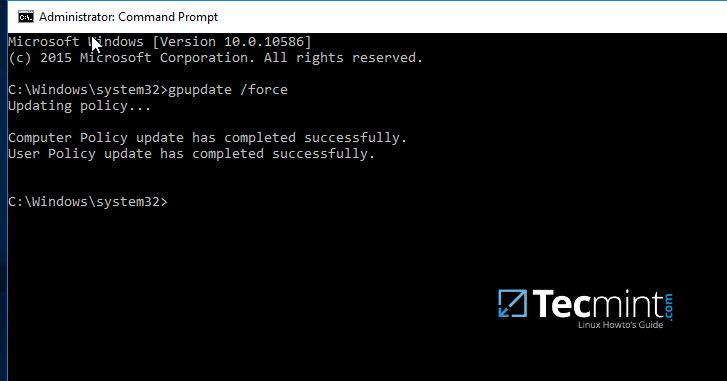
12. After finishing editing the two entries, close all windows, open an elevated Command prompt and force group policy to apply on your machine by issuing the below command:
gpupdate /force
13. Finally, reboot your computer and you’ll see the logon banner in action when you’ll try to perform logon.
That’s all! Group Policy is a very complex and sensitive subject and should be treated with maximum care by system admins. Also, be aware that group policy settings won’t apply in any way to Linux systems integrated into the realm.


