How to Remotely Shutdown or Restart a Windows Computer
You can even remotely shutdown a computer over the Internet, but you would first have to either VPN into the network or into the target computer you want to shut down. I’m not going to cover VPNs in this article, but if that’s something you want to do, feel free to Google it.
You can perform a remote shutdown from the command prompt using the shutdown command and its associated switches, from the remote shutdown dialog box, or from a batch file. I’ll go through all three methods in this article.
Remote Shutdown Overview
In order to get this to work, there are a couple of steps you have to complete first otherwise you’ll constantly get an Access is Denied (5) error message and it will drive you mad.
Step 1: Firstly, in order to remotely shutdown a computer on your network, you’ll need to make sure you have Administrative access to the target computer. If you’re on a home network, the best way to do this is to make sure all computers are in the same workgroup and that they all have at least one Administrator account with the same username and password.
You don’t have to use the built-in administrator account on either computer for this to work, but the user account you do use on both computers has to be part of the Administrators group on the local computer. If you go to Control Panel and click on User Accounts and it says Administrator or Local Administrator, then you’re fine. Again, the names of the user accounts and the password have to be the same.
If you’re in a corporate environment with a domain, you will probably want to login using the domain administrator account. Using those credentials, you should be able to shutdown any other computer on the network, even if they are logged in using different credentials.
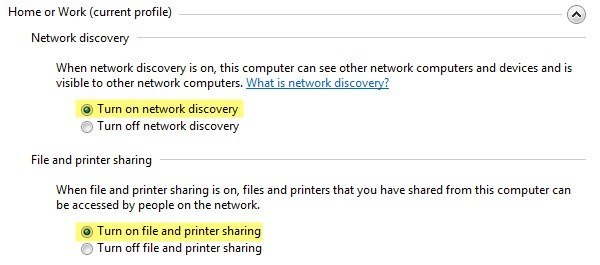
Step 2: The second step is to turn on File and Printer Sharing and to allow it through the Windows firewall. To do this, go to Control Panel and click on Network and Sharing Centerfirst. Click on the Change advanced sharing settings link in the left menu and select the radio button for Turn on network discovery and Turn on file and printer sharing.
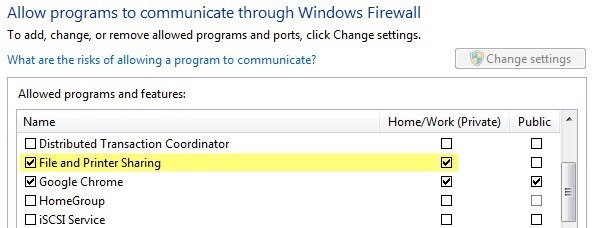
Go back to the main Control Panel window and click on Windows Firewall. Click on the Allow a program or feature through Windows Firewall in the left menu.
Make sure you only check the Home/Work (Private) box and not Public. You do not need to allow anything else through the firewall. You might read on other sites to allow WMI, Remote Shutdown, Network Discovery, etc, but I’ve tested it without any of those and it works just fine.
Step 3: Lastly, if you are trying to target a Windows Vista, Windows 7 or Windows 8 computer remotely, you will need to modify the registry. Unless you do this, it simply won’t work. You will only get the Access is Denied message no matter what.
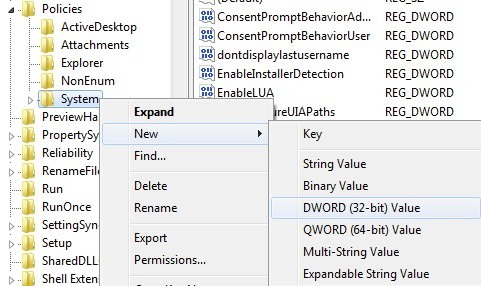
Open the registry editor by going to Start and typing in regedit. Now navigate to the following key:
HKEY_LOCAL_MACHINE – SOFTWARE – Microsoft – Windows – CurrentVersion – Policies – System
Right-click on System on the left hand side and choose New – DWORD (32-bit) Value.
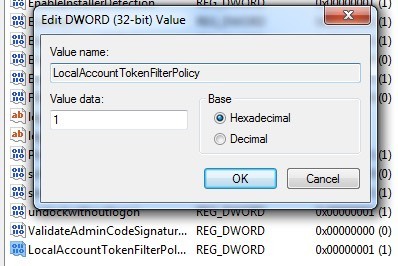
A new value will pop up at the bottom in the right window and the text will be highlighted. Change the name to LocalAccountTokenFilterPolicy and press Enter. Now double-click on it and change the value from 0 to 1.
Click OK and close out of the registry. You don’t need to restart the computer as the changes should take effect immediately. This registry key is needed because in Windows Vista and higher, an administrator account is stripped of its credentials when connecting remotely. This will allow the account to remain with administrative privileges.
You’ll also read on other sites to start the Remote Registry service if that’s not running and to edit the local security policy by adding the Everyone group to Force shutdown from a remote system policy setting. In my testing on Windows 7 and 8, there was no need to complete these tasks and you really shouldn’t because it opens up your system to potential hackers.
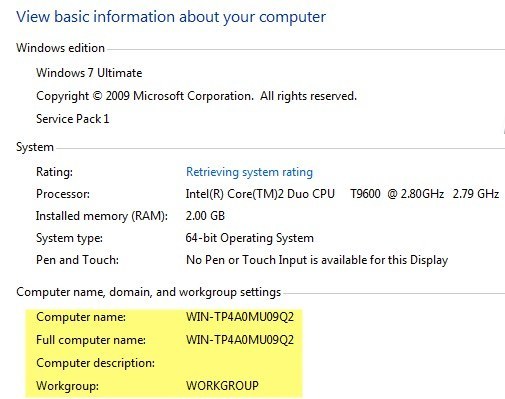
Obviously, you’ll also need to know all the names of the other computers on the network. You can do that by going to Control Panel and then clicking on System.
Remote Shutdown via Command Prompt
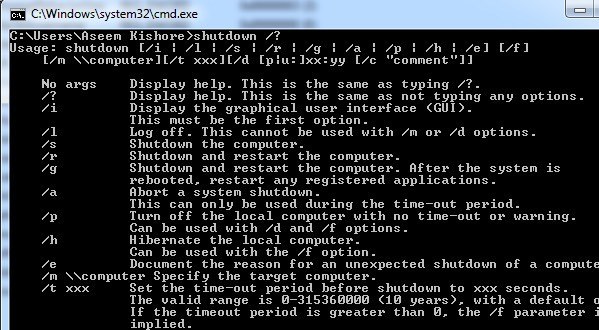
The shutdown command is most flexible when using it from the command prompt because you can add a bunch of switches to it, which allow you to customize the behavior. Go to Start, then Run, and type in CMD. You can see the list of switches by typing shutdown /? in the command window.
You have to use at least one switch in order for the command to do anything. Basically you would type in shutdown /x /y /z where x, y, z are letters in the list above.
Here are a couple of the most common command switches and the actions they perform:
/s: Shuts down the computer
/r: Restarts the computer
/m \\computername: The target remote computer to shut down
/f: Forces programs to close immediately
/t: Will wait a certain amount of time in seconds before shutting down or restarting
/a: Aborts a shutdown if you used a previous shutdown command with /t.
So for remotely shutting down another machine on your network, you would type into the command prompt the following commands:
shutdown /m \\computername /r /f
This command will restart the computer named computername and force all programs that are still running to close.
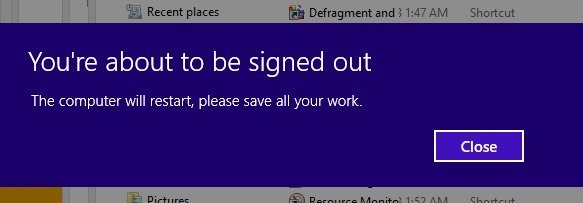
shutdown –m \\computername –s –f –c “The computer will restart, please save all work.” –t 60
This command will shutdown the computer named computername, force all programs that are running to close, show a message to the user and countdown 60 seconds before it shuts down.
Remote Shutdown via Shutdown Dialog
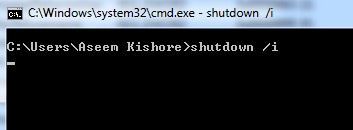
If you don’t like all those switches or using the command prompt in general, then you can bring up the shutdown dialog box. You can do that easily by just using the /i command switch for the shutdown command.
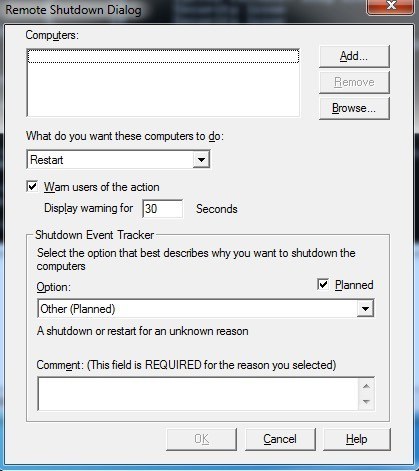
The remote shutdown dialog will now appear as shown below.
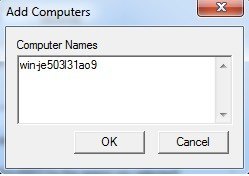
Click the Add or Browse button to add computers to the list. You can then run the commands on the entire batch of computers. If you click Add, you’ll need to enter in the network name of the computer in the format \\computername or just computername, either works.
Of course, you need to know the actual computer name, which I mentioned how you can determine above. So add as many computers to the list as you like and then set your options. You can shutdown, restart or annotate unexpected shutdown.
You can also display a warning, if you like, for however many seconds you choose and you can type in a comment at the bottom which will be displayed to users. That’s about it!
Remote Shutdown via Batch File
Finally, you can create a batch file so that can do all of this by just running the file. Alternatively, you can schedule the batch file to be run at specific intervals or during specific events using Task Scheduler.
Just go to Notepad and type in the commands you would have typed into the command prompt:
shutdown –m \\computername1 –r
shutdown –m \\computername2 –r
shutdown –m \\computername3 –r
Then simply save the file with a .BAT file extension by choosing All Files for Save as type and add .bat to the end of the file name.
This will restart three computers on my home network. You can put as many commands into the batch file as you like, so feel free to experiment!
I’ve written an extensive post on how to use batch files in Windows, so read that if you are not familiar with batch files or task scheduler. Enjoy!

